
How to Choose the Right Gift Box Size for the Contents
Choose a gift box by comparing the packed contents’ maximum length, width, and height with the box’s usable internal dimensions. The box is workable only when all three internal dimensions accommodate the contents plus the clearance needed for wrapping, cushioning, insertion, and closure; there is no universal clearance amount.
Gift-box dimension fit checker
Enter the minimum internal space your packed contents require after accounting for wrapping, cushioning, and the clearance needed for placement and closure. Then enter the candidate box's usable internal dimensions in the same unit.
Result: Enter both sets of dimensions to compare the box with the required space.
This checker identifies a dimensional shortfall or surplus only. A box that meets all entered minimums still needs a physical insertion-and-closure check, and there is no universal numerical threshold for “too much” surplus space.
Gift box size is a dimensional fit relationship rather than a universal small, medium, or large label. Start with the actual contents in the form in which they will be packed, then compare that required space with a candidate box.
Clearance changes with item shape and fragility, wrapping, cushioning, and the closure. More protective material can require more internal space, while unnecessary surplus can create extra movement.
Table of Contents
Measure the Gift Contents Before Choosing a Box
Reliable box sizing starts with the complete, final gift contents physically gathered in the form in which they will be packed.
Work with the actual items that will go into the box so their length, width, and height can be measured and recorded consistently.
The measurable gift contents include the form in which each item will actually be packed, including rigid packaging or protruding parts when they affect its dimensions.
If the item set is not yet final, choose the contents first before recording measurements.
Use a flat surface and one unit system for the complete set so every recorded dimension remains directly comparable.
Prepare the contents in this order so the physical item set and its recorded dimensions stay aligned:
- Gather and verify every item intended for the gift box.
- Place the complete gift contents on a flat surface in the form in which they will be packed.
- Measure the relevant length, width, and height of the items consistently.
- Record every dimension using one unit system.
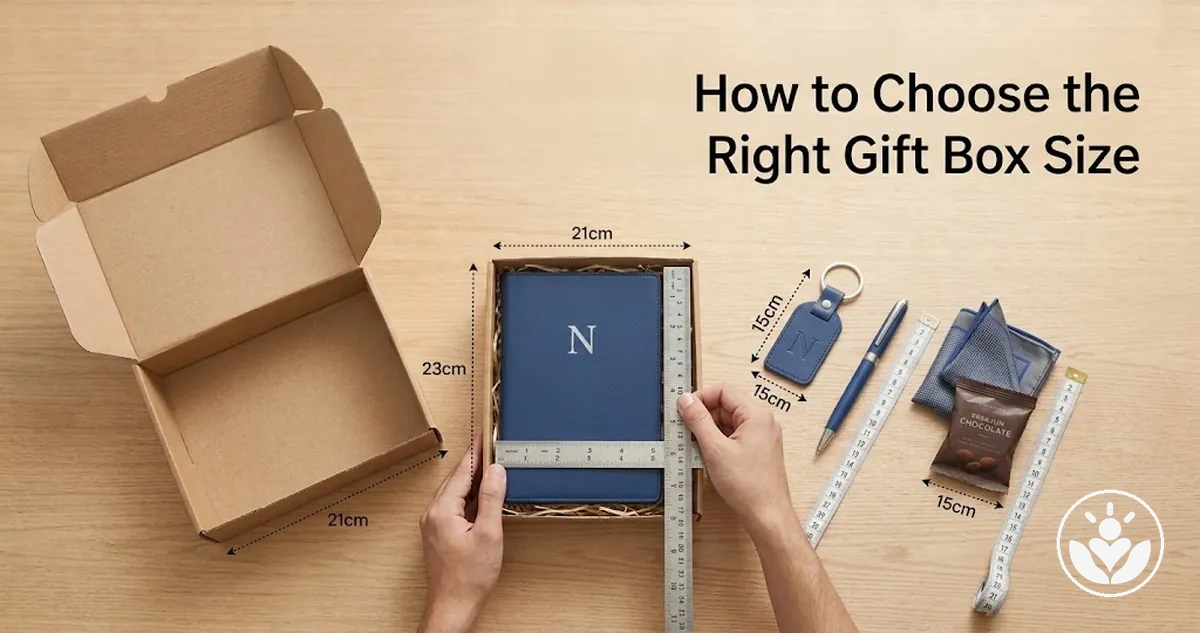
The image shows the gathered gift contents positioned for consistent measurement before a box is selected.

If another item is added after the first measurement set is recorded, the measurable contents have changed, so the affected dimensions need to be measured again.
The completed measurement set then provides the input for evaluating the contents in more detail.
Measure Each Item's Length, Width, and Height at Its Maximum Points
Measure each gift item at its maximum length, width, and height rather than from a visually convenient edge.
These three maximum measurements define the item's bounding dimensions so protruding edges or irregular contours that occupy additional space are included.
- Length: Measure from end to end across the item's maximum length, including any protruding part that extends beyond the main body.
- Width: Measure across the widest point so the recorded width represents the item's maximum side-to-side extent.
- Height: Measure to the tallest point or deepest point relevant to the item's intended orientation so the recorded height represents its maximum vertical extent.
Each measured value establishes the minimum corresponding internal box dimension needed to contain that extent before any additional clearance is considered.
For irregular items, the maximum point may fall on a protrusion or contour rather than a straight edge.
The image labels the item's maximum length, width, and height and shows where those measurements extend from one maximum point to the opposite maximum point.
Retain all three dimensions for the later box comparison.

Measure the Combined Footprint and Height of Multiple Items
When multiple items must share one gift box, treat the grouped gift contents as one combined fit envelope rather than sizing the box from the largest single item.
The grouping has a combined footprint defined by its occupied length and width, plus an overall height defined by the highest point of the group.
Items placed side by side can extend the combined length or combined width, while stacked items can reduce the occupied base area but increase the overall height.
In a mixed-height grouping, the tallest item or the top of a stack sets the group's highest point.
The actual dimensions depend on the intended grouping and orientation, and the resulting combined length, combined width, and overall height become the minimum dimensional requirements before clearance is added.
The image shows how multiple items occupy one combined fit envelope across these three dimensions.

For example, moving one item from beside another to a stacked position can reduce one dimension of the combined footprint while increasing the overall height.
Use the intended grouping as the measurement input for sizing; detailed decisions about how to arrange items inside the box belong to the placement stage.
Match the Content Dimensions to the Box's Internal Dimensions
Compare each measured content dimension with the corresponding usable internal box dimension: length with length, width with width, and height with height.
Each internal dimension must accommodate the measured content requirement plus any clearance required for the intended contents and closure.
Internal dimensions determine usable space. External dimensions and nominal size labels cannot substitute for this comparison because wall thickness, inserts, and box construction can change the space actually available inside.
A dimension is insufficient when the available internal space falls short of the measured requirement and necessary clearance, workable when it accommodates that requirement, and excessive when it leaves more unused space than the intended fit requires.
Because clearance depends on the contents, protective material, and closure requirements, there is no universal buffer for every box.
The table maps each measured content requirement to its corresponding usable internal dimension and resulting fit implication.
| Content criterion | Compare with | Fit implication |
|---|---|---|
| Measured content length | Internal box length | Insufficient if available length falls short; workable if the requirement and necessary clearance are accommodated; excessive if more usable length remains than the intended fit requires. |
| Measured content width | Internal box width | Insufficient if available width falls short; workable if the requirement and necessary clearance are accommodated; excessive if more usable width remains than the intended fit requires. |
| Measured content height | Internal box height | Insufficient if available height falls short; workable if the requirement and necessary clearance are accommodated; excessive if more usable height remains than the intended fit requires. |
All three relevant dimensions must pass together: adequate length cannot compensate for insufficient width or height.
The image illustrates the measured content envelope within the box's usable internal space so the dimensional relationship can be seen without relying on external box size.

Compare Length, Width, and Height in the Intended Orientation
Use the same intended orientation when mapping the contents' length, width, and height to the corresponding internal box dimensions.
If you rotate an item or grouped contents, the dimension mapping changes, so that orientation must satisfy every relevant fit constraint in its new correspondence.
The image shows the same item in two orientations so the changed length, width, and height mapping to the same candidate box is clear.

Rotating an item can make its previous length align with the box's width and its previous width align with the box's length, while height must also be evaluated in that position.
An orientation fits only when all three mapped content dimensions remain within their corresponding usable internal box dimensions after the required clearance is considered.
If two dimensions fit but the third exceeds its corresponding internal box dimension, that orientation fails.
A different orientation may be workable, but closure and usable space still need to satisfy all three fit constraints.
Allow Enough Clearance for Placement and Closure
Allow some clearance beyond the raw content measurements so the contents can be placed inside and the box can close without unnecessary compression.
The required extra room is context-dependent rather than a fixed allowance because the contents and packing conditions determine how much usable internal space is needed.
The main conditions that can change the clearance requirement are:
- Fragility: Fragile contents may require more room when protective cushioning must sit around them without creating pressure on the items.
- Irregular shape: Protrusions or uneven contours can require additional clearance where the item's occupied space extends beyond a simple rectangular form.
- Wrapping: Wrapping that increases the packed dimensions also increases the usable internal dimension required for placement.
- Cushioning: Protective cushioning occupies internal space, so its thickness and position affect the extra room required around the contents.
- Lid and closure: The intended closure needs sufficient clearance for the lid to close without pressing the contents or their protective material beyond the available internal space.
Too little clearance can create compression or prevent practical placement and closure, while workable clearance accommodates the packed contents without unnecessary pressure.
Excessive clearance leaves more unused space than the intended fit requires; detailed filler selection or correction of that empty space belongs outside this subsection.
The image illustrates the clearance between packed contents and the usable internal boundaries needed for placement and closure.

Compare Actual Dimensions Rather Than Relying on Standard Size Labels
Compare the decision basis
Small / medium / large
A category label only. It does not state the usable internal length, width, and height, so it cannot confirm fit.
Usable internal dimensions
Length × width × height provide the measurable fit basis. Record the contents and the box in one consistent unit system.
Decision rule: Use the box's actual usable internal length, width, and height—not its nominal size label—as the fit standard.
Boxes with similar size labels can provide different usable space because their construction or format can vary. If construction differences matter beyond capacity, compare gift box packaging types separately.
Verify the Fit Before Finalising the Box Size
Verify fit against the actual contents before finalising the selected box size.
The check should confirm that the box's internal dimensions allow practical insertion and closure without problematic compression, excessive movement space, or an obvious dimensional mismatch.
Each observable result is a fit signal rather than proof of a single cause.
Difficulty with insertion or closure can indicate that the selected internal space needs reassessment, while excessive movement space can suggest that the chosen size provides more room than the contents require.
Check the recorded measurements as well when the physical result conflicts with the expected fit, then use corrective sizing where the selected dimensions do not work as intended.
Use the following checks as a verification gate before treating the size as final:
- Insertion: Place the contents inside without forcing them; resistance or interference signals that the available space or intended orientation should be reassessed.
- Closure: Close the box normally; pressure on the contents or difficulty closing suggests that the available height or another relevant internal dimension may be insufficient.
- Compression and dimensional mismatch: Check for visible squeezing, distortion, protrusion, or another obvious conflict between the contents and the available internal space; any such signal triggers reassessment rather than an assumption about the cause.
- Movement space: Check whether the contents have more free movement than the intended fit requires; excessive movement space can indicate that the selected box is larger than necessary for the contents.
- Measurement consistency: If the physical check differs from the expected result, remeasure the contents and internal dimensions using the same unit system before making a corrective sizing decision.
A failed physical check means the selected size should be reassessed rather than accepted from the original estimate.
The appropriate size adjustment depends on which fit signal appears and what remeasurement or physical checking shows.
When the Box Is Too Small for the Contents
A box is too small when at least one required internal dimension cannot accommodate the contents plus necessary clearance without compression or preventing proper closure.
Difficult insertion, compression, or incomplete closure can indicate an insufficient dimension, but the measurement and orientation should be checked before treating that symptom as a confirmed size failure.
Correction path
- Identify the failing dimension. Remeasure the contents and compare the intended orientation with the corresponding internal box dimension.
- Correct the input if needed. If the apparent failure came from inaccurate measurement or an incorrect orientation, fix that input and verify the fit again.
- Increase the constrained dimension when it still falls short. Choose a larger box whose corresponding internal dimension accommodates the contents and necessary clearance.
- Fix the dimensional constraint itself. Do not treat wrapping-paper changes or substantial box alteration as a substitute for correcting a box that is dimensionally too small.
When the Box Is Too Large for the Contents
A box is too large when its unused internal space is materially greater than the clearance the contents need for practical placement and closure.
There is no universal surplus-space threshold because the required clearance depends on the contents and packing conditions; excessive space may provide more movement room or produce a weaker visual proportion, but neither outcome is inevitable.
Assess the surplus space
- Confirm the contents
- Remeasure the actual item set so the comparison starts from the contents that will really be packed.
- Locate the surplus
- Compare required and available internal length, width, and height to see which dimension creates the unnecessary extra space.
- Downsize conditionally
- If the surplus is not needed for another valid constraint, a smaller box can reduce unused internal space and provide a more controlled fit.
- Retain when constrained
- If another valid requirement makes the larger box necessary, it can remain oversized relative to the contents even though changing size is impractical.
Decision rule: Base corrective sizing on the dimensional comparison, not on a size label or appearance alone.
If the larger box must be retained, the next task is to manage empty space; that is separate from deciding whether the selected box size is appropriate.