
Tall or top-heavy
Primary concern: tipping or rotation. Check the base footprint, centre of mass, unsupported height, and whether higher side support is needed.
To keep gift box items securely in place, support each item on a firm base, brace the side or top clearance where movement is possible, and cushion vulnerable contact surfaces so contents cannot slide, tip, lift, or strike one another. Before final closure, use a gentle movement check and correct only the gap or support point that still moves; this can usually be done without glue.

Movement-control guide: what to inspect and change
Match the movement you can observe to the support area to inspect first. A movement signal narrows the check; it does not prove one single cause.
Finish when: no meaningful movement is detected under gentle handling, the box closes normally, and the contents are not distorted or crushed. A gentle test verifies the tested handling condition, not every possible transit event.
The amount and position of restraint depend on the item's mass, height, fragility, clearance, support firmness, and expected handling. Heavier or taller items may need firmer or higher support, while fragile items need cushioning that restricts movement without creating damaging contact or compression.
Securing the contents is separate from sealing the outer gift box. If movement remains after packing, identify its direction and the support point that is failing rather than adding filler indiscriminately.
Item movement should be identified by direction and form before the packing is changed, because sliding, tipping, rattling, and vertical lift can point to different support conditions.
Movement direction narrows the area to inspect, such as lateral clearance, base firmness, side support, top clearance, or cushioning position, but it does not confirm a single cause.
A gift box item that slides sideways therefore requires a different check from a tall item that pivots from its base.
The diagram maps each movement direction to the support area that should be inspected first.
It distinguishes lateral, rotational, and vertical movement without implying that one movement pattern has only one possible cause.
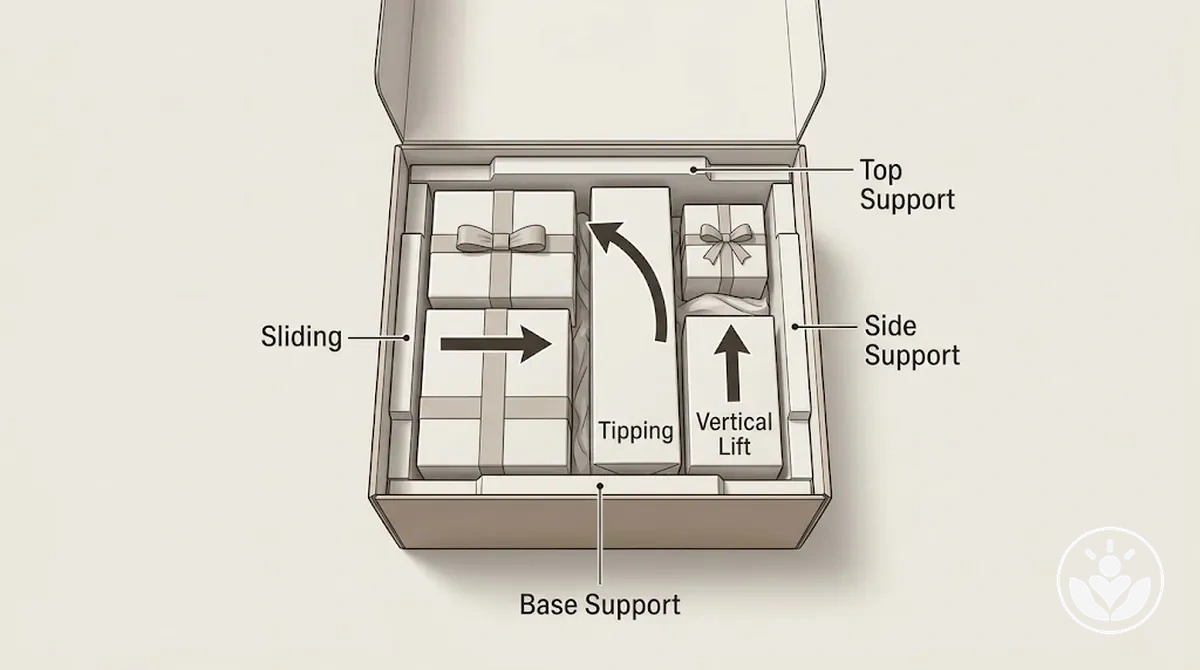
One movement signal can result from more than one support failure, so the observed direction should guide the inspection rather than be treated as a definitive cause.
The next step is to inspect the support point associated with the movement pattern and confirm which condition is actually allowing the item to shift.
Excess clearance gives an item more distance to slide or rotate before surrounding support restrains it.
In an oversized box, a lateral gap beside the item footprint creates a longer sideways movement path, while unused headroom leaves more room for vertical movement.
The larger the unrestrained gap, the farther the item can move before bracing or support engages.
The image highlights the free space around the item and the movement path available before support engages.
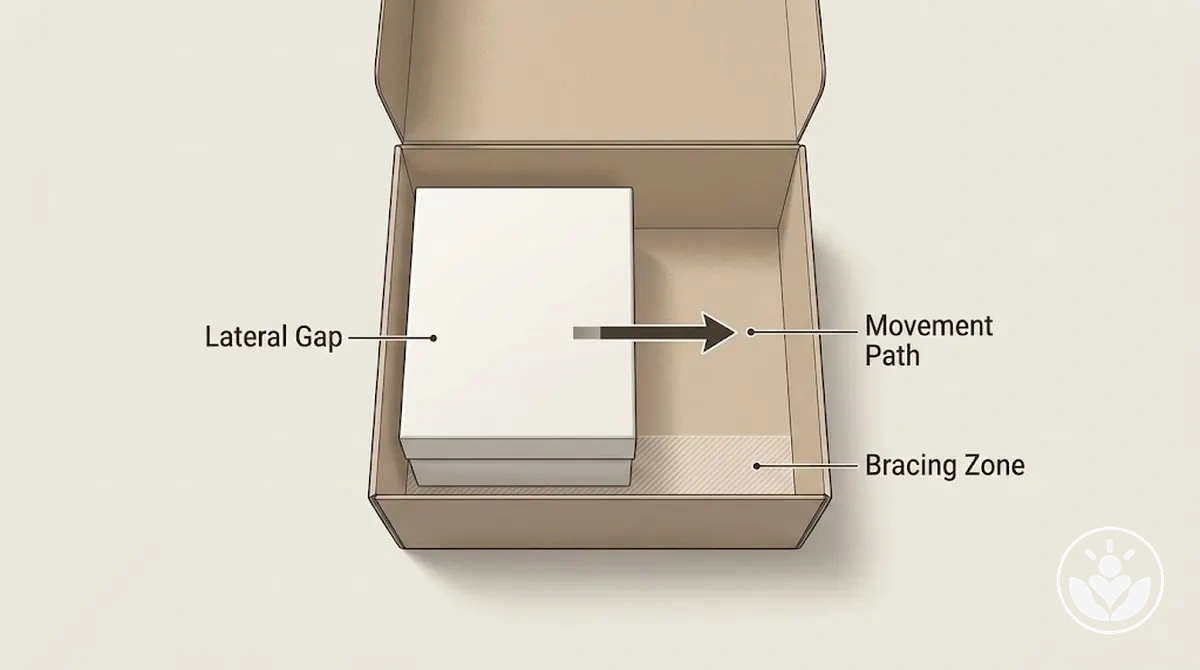
Clearance is not automatically a problem when bracing controls the available movement and remains stable during expected handling.
A lateral gap leaves room for sideways movement, while unused headroom leaves room for vertical movement unless the relevant support restrains it.
If excessive clearance means the box interior is too large for the arranged item footprint, choose a better-fitting box rather than relying on local bracing to compensate for the fit.
Some clearance can remain acceptable when it is deliberately braced and does not leave an uncontrolled movement path.
A tall item can tip when an unstable base or low side support allows it to rotate instead of holding its position.
A narrow base footprint can make pivoting easier, particularly when the item's centre of mass sits relatively high, while item weight can increase the load placed on the supporting base layer.
The result depends on the item's geometry and support conditions rather than height or weight alone.
The diagram shows why base stability and support height affect rotation.
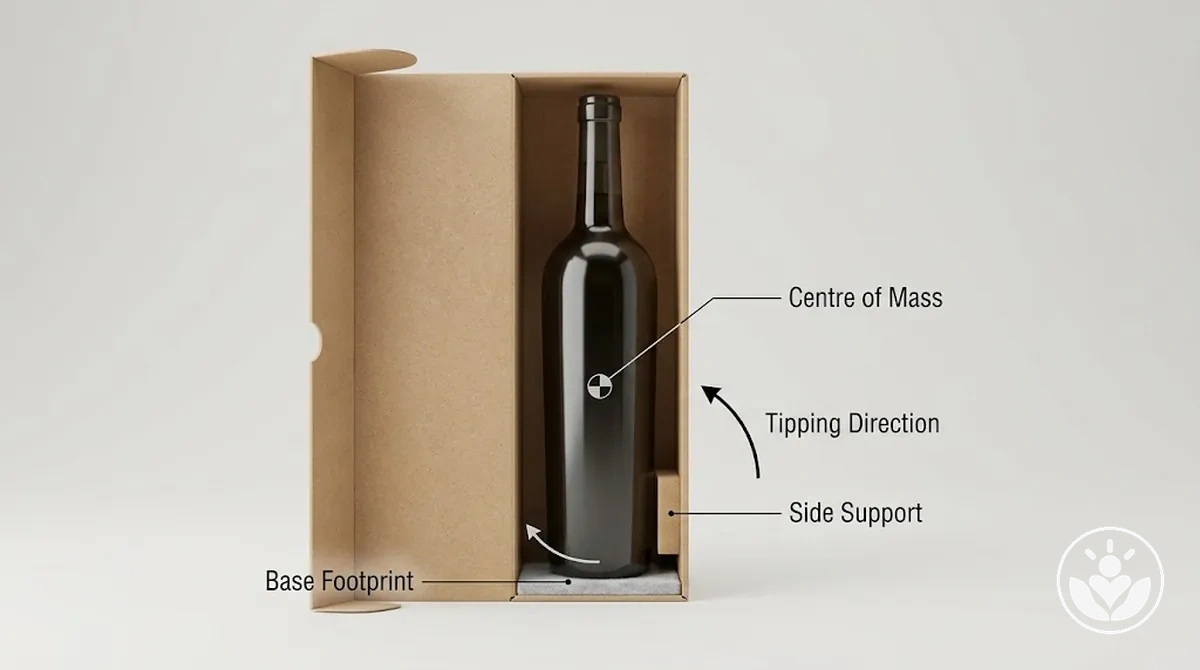
What changes tipping tendency
Under similar filler conditions, a wide low jar has a broader base footprint and less unsupported height than a tall narrow bottle, so the bottle can have a greater tendency to rotate when side support remains low.
When stability depends on how different items are positioned and supported together rather than on one local support point, arrange items securely with their shapes and balance in mind.
Upper support is most relevant when the item's geometry and balance leave enough unsupported height for pivoting to occur.
Loose cushioning can compress, settle, or migrate away from the point it originally supported, allowing clearance to reopen even when the gift box initially looks full.
When compression or migration reduces contact with the item, support decreases and a reopened gap can make movement possible.
The image shows the difference between apparent fullness and cushioning that has shifted away from the item, leaving part of the original support position unfilled.
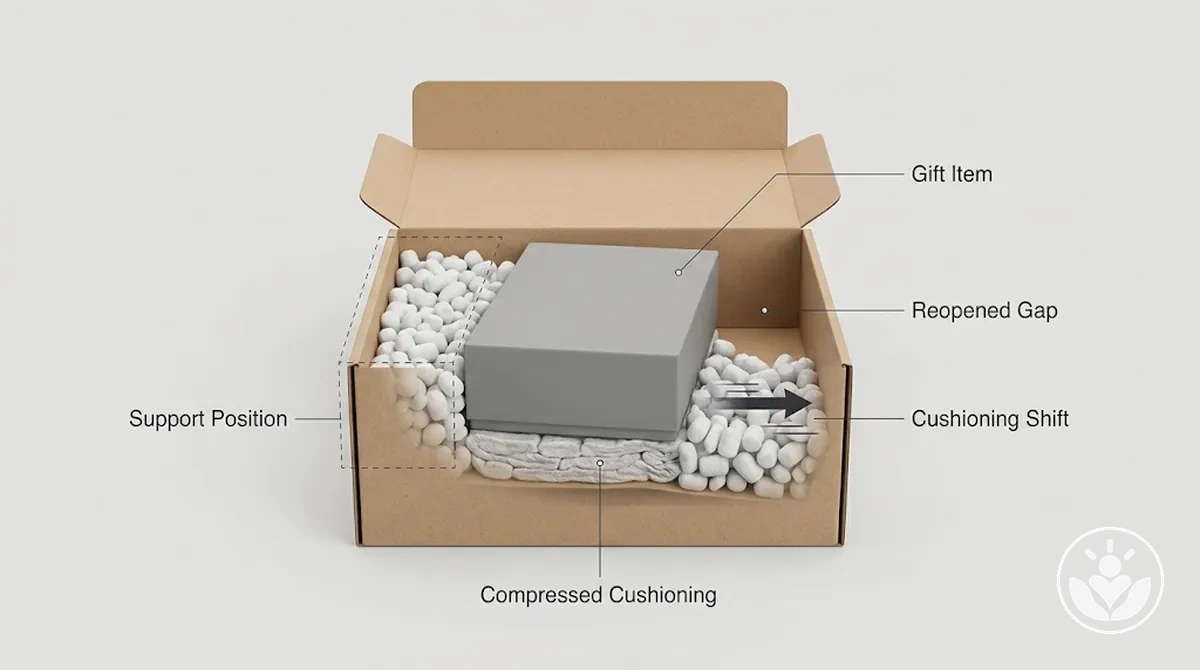
How much support is lost depends on the cushioning's firmness, the item weight pressing into it, its placement, and the handling that can encourage settling or migration.
For example, a heavy item resting against loose cushioning can compress the material beneath it while handling shifts some cushioning sideways, leaving a local gap despite the box still appearing full overall.
Where these conditions make stable restraint difficult, choose fillers and cushioning according to the support the contents require rather than visible fullness alone.
Effective support depends on cushioning remaining in the position where it restrains the item.
Gift box items can be stabilised without glue by building non-adhesive restraint around them rather than attaching them to the box.
A stable base and firm surrounding contact restrict movement through friction, contact area, controlled clearance, and support firmness.
Side support and top support can then control the directions in which an item can still move, with the amount and placement of support adjusted for its shape and fragility.
Securing the contents this way is separate from sealing the outer box.
The sequence matters: establish the base, position each item, brace the remaining movement directions, then verify the result.
The visual shows how support is built around an item rather than attached to it, making the spatial progression from base support to a stable arrangement clear.
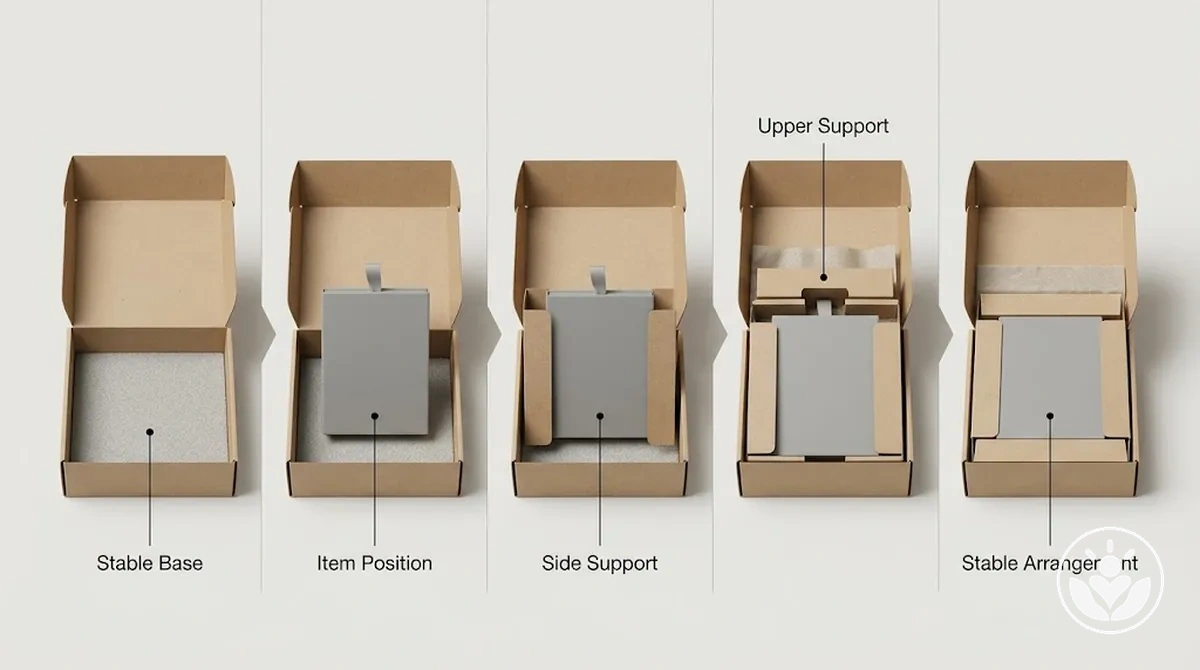
Final restraint should use distributed pressure across suitable contact areas instead of creating a hard pressure point that could crush, distort, or scuff the contents.
The required support depends on item shape, fragility, weight, surface characteristics, and the directions in which movement is still possible.
Verify the finished arrangement by confirming that the items remain in position without excessive compression or damaging contact.
A firm base should support the item without allowing uneven sinking or compression that changes its resting position before side bracing is added.
The support layer needs a level surface and enough firmness for the item weight and base footprint, so the load is carried without a developing lean.
The required firmness depends on the item's mass, footprint, and the compression behaviour of the supporting material rather than on one prescribed base thickness.
The image highlights even base contact and resistance to uneven sinking beneath the item.
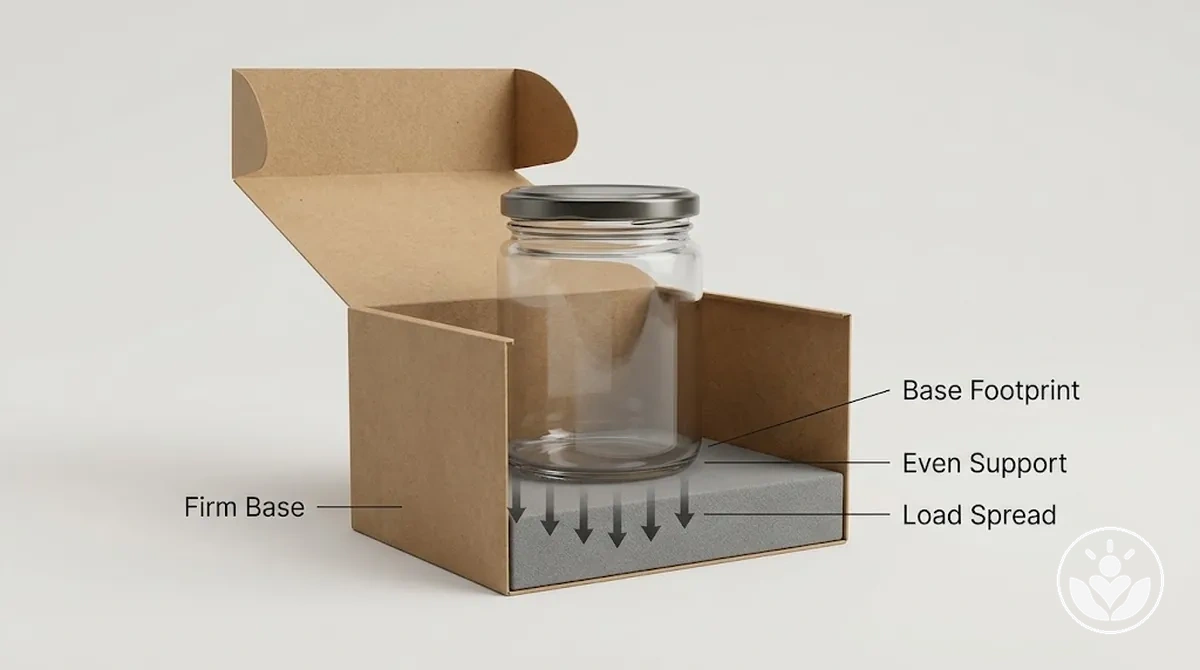
Build the foundation in three steps: level the support layer, seat the item on its stable resting surface, then check how the layer behaves under load.
These checks establish whether the base remains stable before lateral restraint is added.
For example, a heavy jar seated directly on loose shred may sink locally if that support layer compresses unevenly under its weight, while the same jar on a firmer underlying support may retain a more even resting position.
The firmness needed for base stability depends on item weight, base footprint, and how the supporting material behaves under load.
Place bracing points only where lateral or vertical clearance still permits movement after the item has a stable base.
The gap location and movement direction determine whether the item needs side bracing, front-back support, or top support.
Each support should provide enough contact area to restrict that movement while maintaining pressure distribution across surfaces that can tolerate contact.
Item shape and fragility determine where and how firmly the support should make contact.
Use the remaining movement path to choose the support location.
Each direction requires support at the corresponding clearance, with contact adjusted to avoid concentrating pressure on fragile surfaces.
There is no universal filler amount in grams or volume that determines secure restraint.
Filler is sufficient when meaningful movement is controlled, the box closes normally, and the contents remain free from damaging compression or distortion.
The required amount changes with gap size, item mass, filler compressibility, rebound, settlement, and the pressure created when the box closes.
Functional stability therefore determines adequacy more reliably than visible fullness.
Judge the filler amount by how it behaves around the packed item rather than by quantity alone.
Larger gaps or greater item mass can increase the support requirement, while compressibility, rebound, and settlement determine whether that support remains where it is needed.
Closure pressure provides the opposite boundary: filler becomes excessive when closing the box compresses or distorts the contents.
Where the task shifts from judging restraint to managing unoccupied volume, control empty space without treating decorative fullness as evidence of stability.
If residual movement remains, support is insufficient or misplaced.
If movement is controlled and the box closes normally without harmful compression, the filler amount is sufficient for that arrangement.
If the contents distort or closure pressure becomes excessive, reduce or reposition the filler because the arrangement is overpacked.
Stabilisation priorities change with the item and handling conditions even though the goal remains movement control.
Tall, heavy, fragile, and shipped items use the same baseline method—stable base, targeted bracing, cushioning where needed, and retesting—but each condition changes which support attribute deserves the most attention.
How the packing priority changes
Tall or top-heavy
Primary concern: tipping or rotation. Check the base footprint, centre of mass, unsupported height, and whether higher side support is needed.
Heavy
Primary concern: support compression and load on the foundation. Use a base that stays level under the item; add upper restraint only when the geometry leaves a pivot path.
Fragile
Primary concern: hard contact and concentrated pressure. Maintain resilient separation at vulnerable surfaces while controlling movement without damaging compression.
Shipped or repeatedly handled
Primary concern: restraint surviving vibration, tilting, and orientation changes. Support may need to control movement in more than the original packed direction.
A tall item may need support above the base when its height, shape, or centre of mass leaves it able to pivot despite having a stable foundation.
A heavy item may need similar restraint when its geometry permits rotation, but item weight alone does not determine whether upper support is necessary.
The base footprint, centre of mass, support height, upper clearance, and available adjacent contact together determine where restraint is useful.
The aim is to restrict an available pivot path without tightly wedging the item against fragile neighbours.
Once pivot risk is present, apply upper support in sequence so each adjustment addresses the item's geometry and remaining clearance.
The four steps move from establishing a stable base position to verifying that the item resists the identified pivot movement.
For example, a tall bottle with a relatively narrow base footprint may benefit from support higher on its body when its upper section can pivot through surrounding clearance.
A low, broad heavy item that remains stable on its base may not need the same upper support, so verify the actual pivot movement rather than treating mass as a universal trigger.
Fragile items need separation from rigid surfaces and cushioning around each vulnerable surface that could make contact during movement.
The cushioning should act as a resilient buffer between the item, the box, and any hard neighbouring object without creating harmful compression.
Four protection conditions
Shipping and repeated handling can expose internal movement paths that remain unnoticed while a gift box is stationary.
Vibration, tilting, acceleration, and each orientation change can shift items toward available gaps or allow cushioning settlement to reopen clearance.
These conditions increase opportunities for lateral movement and vertical lift, especially when item mass increases the force applied to internal support during movement.
The restraint requirement therefore depends on the handling the box is expected to experience rather than on its appearance at rest.
Transit conditions change how internal support must behave over repeated movement events.
Use the following conditions to judge whether stronger multidirectional restraint is justified.
A carefully carried hand-delivery box may experience fewer repeated movement events than a parcel handled through multiple orientation changes, tilts, and vibrations.
That difference does not make one packing method universally sufficient or insufficient, but it may justify stronger multidirectional restraint when the expected handling creates more opportunities for internal movement.
Test for remaining movement before final closure by observing what moves, identifying its direction, adjusting the relevant support, and then retesting.
Treat the movement signal as a guide to the support point that needs inspection rather than proof of one exact cause.
Use a controlled, gentle test that reveals movement under the tested condition without aggressive shaking.
The detailed check below maps each observed movement to the support area to inspect, then the final correction step shows how to retest the same movement after a local adjustment.
Use a gentle handling stability check to detect meaningful sliding, tipping or rotation, vertical lift, rattling or contact, and cushioning displacement before closing the gift box.
This is a physical packed-box movement check, not product shelf-life or formulation stability testing.
Observe each signal without aggressive shaking, especially when the contents include glass, liquids, delicate finishes, or loosely closed containers.
The pass condition is no meaningful item movement under gentle handling and no damaging compression from the restraint.
If movement remains, the arrangement requires correction at the relevant support area before final closure.
Target the exact gap location or specific support point associated with the remaining movement instead of adding material throughout the box.
Treat the observed symptom as a signal of where to inspect, then check that support point before choosing the correction.
Reposition, firm, or redistribute the existing support according to the movement path that remains rather than assuming one cause.
Match the movement to the correction
After the local adjustment, retest the same movement direction under the same gentle handling condition.
Confirm the correction only when the retest shows that the targeted movement has been controlled without creating a new support problem.